Cherry Pie Filling

Cherry pie filling is a cherished ingredient that transports us back to the comforting embrace of homemade desserts. With its sweet and tart profile, this cherry pie filling can elevate any dessert from simple to sensational. The vibrant, glossy hue of the filling adds a delightful pop of color to pies, tarts, and even breakfast treats, while the flavor bursts with the essence of summer. Whether you’re using fresh farmer’s market cherries or frozen ones from last season’s harvest, this recipe is your ticket to joyfully indulging in delicious baked goods year-round.
Table of Contents
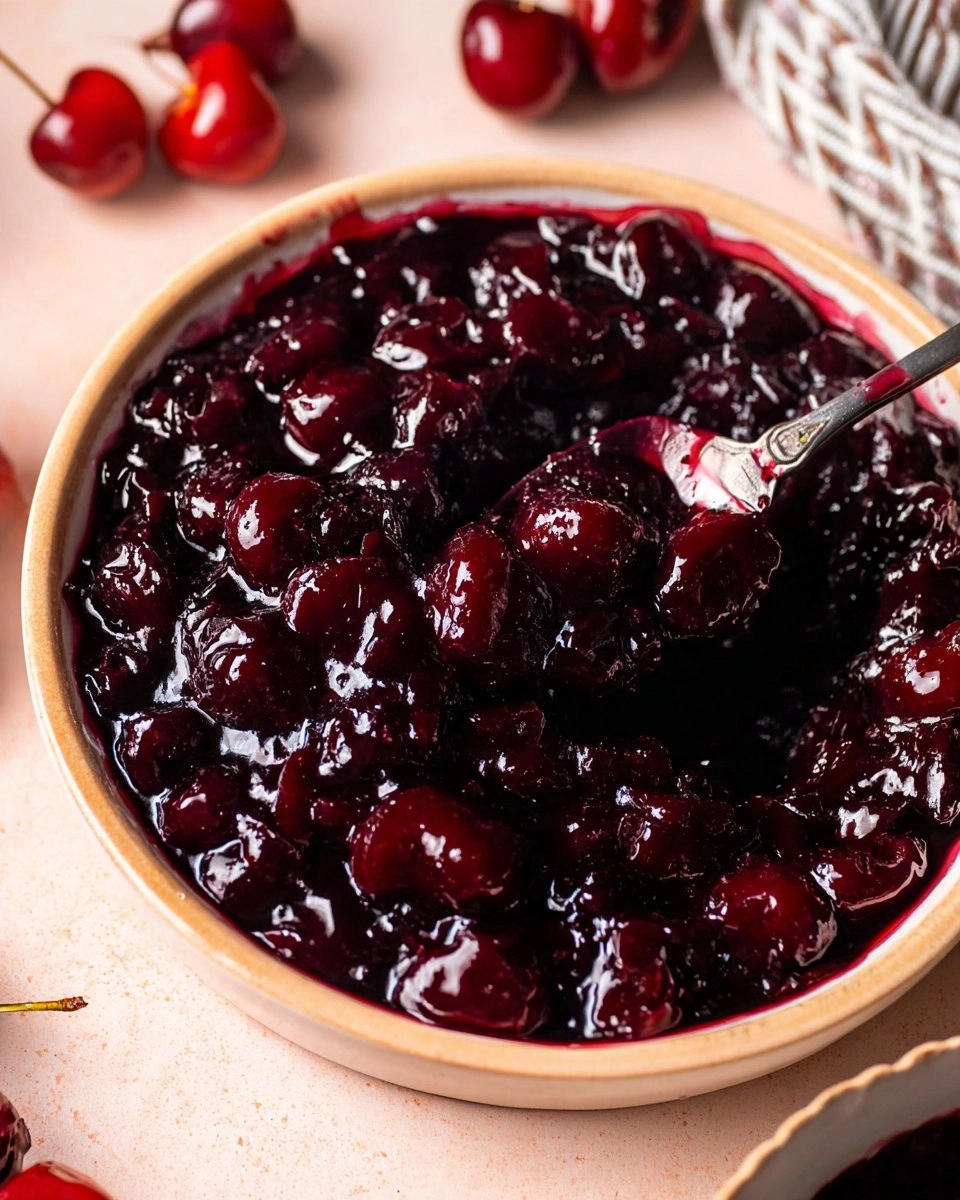
I vividly remember the first time I made this cherry pie filling for a family gathering; my grandmother watched with a twinkle in her eye while sharing stories of her own kitchen creations. There’s something magical about preparing a recipe that has stood the test of time. The moment I poured the thick, luscious filling into a pie crust and sealed it with a lattice top, I felt a flood of warmth and nostalgia. This cherry pie filling is not only easy to whip up but also incredibly budget-friendly, making it a perfect solution for those sweet cravings or special occasions. You’ll be genuinely glad to have this recipe in your collection, so let’s dive in!
Why You’ll Love This Recipe
- Simple & Quick: This cherry pie filling comes together in just about 20 minutes, giving you more time to enjoy dessert!
- Irresistible Flavor: The combination of sweet cherries and a hint of almond extract creates a flavor profile that’s both comforting and unforgettable.
- Eye-Catching Appeal: With its bright red color and glossy finish, this cherry filling is not only delicious but also visually stunning.
- Flexible Serving: Perfect for pies, ice cream toppers, pancakes, or even straight from the bowl as a treat!
- Diet-Friendly Options: Easily adaptable for gluten-free or vegan desserts by substituting a few ingredients.
Ingredients You’ll Need
- 1 lb Cherries: Fresh or frozen, your choice! Pitting fresh cherries is key to a smooth filling, while frozen ones are perfectly convenient.
- 1/2 cup White granulated sugar: This sweetener enhances the natural sweetness of the cherries and balances the tartness, creating that perfect flavor.
- 1 TBSP Cornstarch: This thickening agent helps achieve the desirable consistency, ensuring your filling isn’t runny.
- 1 TBSP Water: A small amount of water helps dissolve the cornstarch and blend it into the cherry mixture smoothly.
- 1/4 tsp Almond extract: This component adds a rich, nutty flavor, enhancing the overall cherry experience.
How to Make Cherry Pie Filling
- Prep the Cherries: If using fresh cherries, start by pitting them. Then, in a medium saucepan, combine the cherries, 1/2 cup white granulated sugar, 1 TBSP cornstarch, 1 TBSP water, and 1/4 tsp almond extract.
- Start Cooking: Set your saucepan over medium heat. Stir gently while the mixture heats up. You’ll notice the cherries start to soften and release their juices, which is what you want!
- Mash & Thicken: Use a potato masher to mash the cherries to your desired consistency. I prefer mashing them until they resemble more of a compote. Continue heating the mixture until it thickens, which should take about 5-7 minutes.
- Cool It Down: Remove the saucepan from the heat and transfer the cherry filling to a bowl. Allow it to cool completely. For faster results, feel free to pop it in the fridge!
Storing & Reheating
To store your cherry pie filling, keep it at room temperature for up to two hours. If you have leftovers, transfer them to an airtight container and refrigerate, where they can safely stay for about a week. For longer storage, freeze the filling in a freezer-safe container for up to three months. When you’re ready to use it, simply thaw it overnight in the fridge and reheat in a saucepan over low heat for about 10 minutes. Just keep in mind that the texture may slightly change upon reheating, but stirring gently will help refresh its delightful consistency.
Chef’s Helpful Tips
- Avoid Overcooking: Keep an eye on the filling while it thickens. Cooking it too long can make it overly thick and change the flavor.
- Cherries Matter: Choose ripe, sweet cherries for the best flavor. If you find that the cherries are too tart, you can add an extra tablespoon of sugar.
- Flavor Brighteners: If you want to elevate the flavor even more, consider adding a squeeze of fresh lemon juice or a dash of cinnamon during cooking.
- Keep it Simple: If you’re short on time, frozen cherries work just as well as fresh ones. They’re already pitted and ready to go!
Cherry pie filling is surprisingly versatile. You can use it in various desserts beyond the traditional pie—think cherry cobblers, sundaes, and even as a fruit topping on yogurt or cheesecake.
This filling is such a delight that once you try your hand at making it, you’ll wonder why you ever bought pre-made varieties. Homemade cherry pie filling brims with love, nostalgia, and the delightful taste of real fruit. The ability to create your own means endless dessert possibilities, but don’t just take my word for it—give it a whirl in your kitchen!

Recipe FAQs
Can I use canned cherries for this recipe?
Absolutely! If you prefer canned cherries, drain them and use them in place of fresh or frozen cherries. Just be aware that you might need to adjust the sugar to cut the extra sweetness from the syrup.
How do I know when the cherry filling is thick enough?
The filling is ready when it’s thickened to a jam-like consistency. You can test it by dragging a spatula through the filling; if it leaves a clean path, it’s thick enough.
Can I make this filling ahead of time?
Yes! You can certainly prepare your cherry pie filling ahead of time. It stores well in the fridge for about a week, or you can freeze it for up to three months. Just make sure to let it cool completely before storing.
How can I enhance the flavor of the cherry pie filling?
There are a few ways to amp up the flavor! Besides the almond extract, adding a splash of vanilla or a pinch of nutmeg can deepen the flavor. A bit of lemon juice also brightens the taste perfectly!
This cherry pie filling recipe is a true gem, allowing for creativity in so many delicious desserts. It’s time to gather your ingredients and create something wonderful in your kitchen! Enjoy the sweet moments, and happy baking!
PrintMore Desserts & Appetizers Recipes
- Banana Split Fluff Salad
- Homemade Cherry Crisp
- Berry Galette
- Cherry Cheesecake Cookies
- No-Bake Cherry Cheesecake
Did You Enjoy Making This Recipe? Please rate this recipe with ⭐⭐⭐⭐⭐ or leave a comment.
📖 Recipe Card

Cherry Pie Filling
- Prep Time: 5 minutes
- Cook Time: 15 minutes
- Total Time: 20 minutes
- Yield: 1 1/2 cups 1x
- Category: Desserts & Appetizers
- Method: Stovetop
- Cuisine: American
Description
This Cherry Pie Filling is a must-try for its perfectly sweet flavor and simple preparation. Made with fresh or frozen cherries, it’s ideal for pies or desserts, making your meals special and enjoyable.
Ingredients
- 1 lb Cherries, fresh or frozen
- 1/2 cup White granulated sugar
- 1 TBSP Cornstarch
- 1 TBSP Water
- 1/4 tsp Almond extract
Instructions
- Pit the fresh cherries if using them. In a medium saucepan, combine the cherries, sugar, cornstarch, water, and almond extract.
- Heat the mixture over medium heat until the cherries begin to soften and their juice separates. Use a potato masher to mash the cherries to your desired consistency.
- Continue to heat until the cherry filling thickens, which should yield about 1 1/2 cups. Transfer the filling to a bowl and let it cool completely. For quicker chilling, place it in the fridge.
Notes
For a thicker filling, increase the cornstarch slightly.
Try adding a dash of lemon juice for added brightness in flavor.
This filling can be stored in an airtight container in the refrigerator for up to a week.
Nutrition
- Serving Size: 1/4 cup
- Calories: 95
- Sugar: 20g
- Sodium: 2mg
- Fat: 0.5g
- Saturated Fat: 0g
- Unsaturated Fat: 0.5g
- Trans Fat: 0g
- Carbohydrates: 24g
- Fiber: 1g
- Protein: 1g
- Cholesterol: 0mg